
Here are the main points to remember when tackling a furniture webbing snapped repair. Keep these in mind to make the process smoother and get the best results for your furniture.
Key Takeaways
- Always check the frame for damage before starting the repair.
- Choose the right type of webbing and fasteners for your furniture.
- Properly tension the webbing for good support; too loose won’t work well.
- Secure the webbing ends firmly with staples and upholstery tacks.
- Weave horizontal and vertical webbing strips in an alternating pattern for strength.
Assessing Furniture Webbing Damage
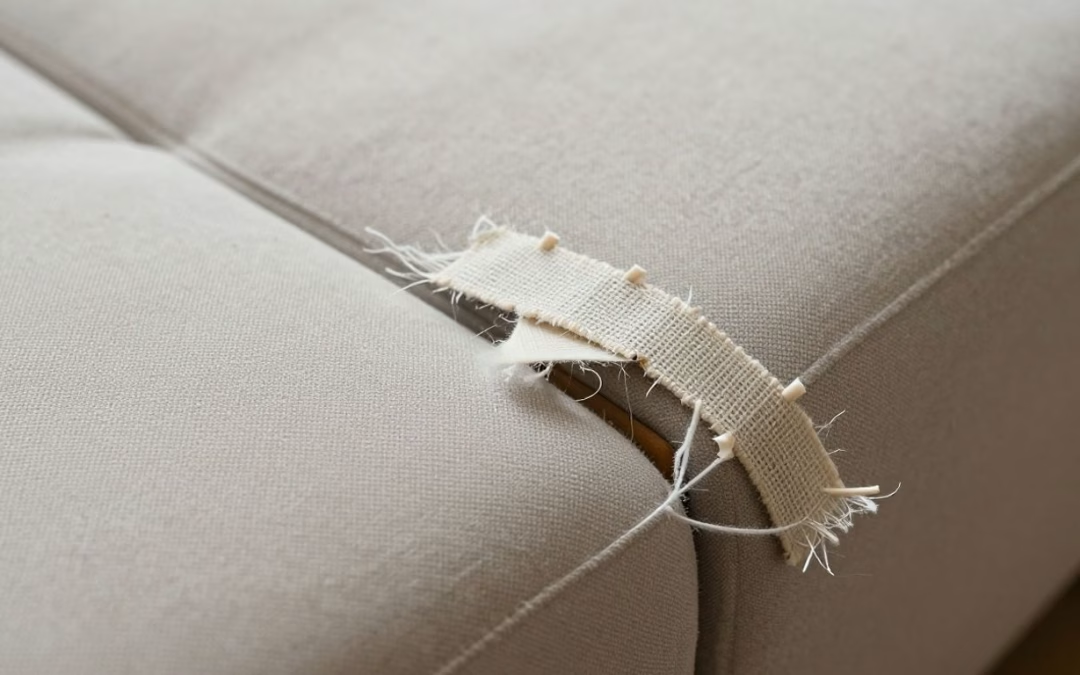
So, your furniture’s webbing has snapped. Bummer. Before you start panicking or thinking about tossing the whole piece, let’s take a good look at what’s going on. It’s not always as bad as it seems, and often, a repair is totally doable.
First off, why did it snap? Was it just old age, or did something specific happen? Sometimes, a single, heavy person sitting down a bit too hard can do it. Other times, it’s a slow wear-and-tear thing. Look closely at the broken ends of the webbing. Are they frayed and worn, or did they just cleanly break?
- Sudden stress: Did someone jump on the furniture, or was there a heavy object placed on it unexpectedly?
- Gradual wear: Does the webbing look thin, brittle, or sun-damaged?
- Frame issues: Is the frame itself loose or damaged, putting extra strain on the webbing?
Understanding the ‘why’ helps figure out the best way to fix it and prevent it from happening again. For instance, if the frame is wobbly, fixing the webbing alone won’t solve the root problem. You might need to look into couch upholstery services if the damage is extensive or related to the overall structure.
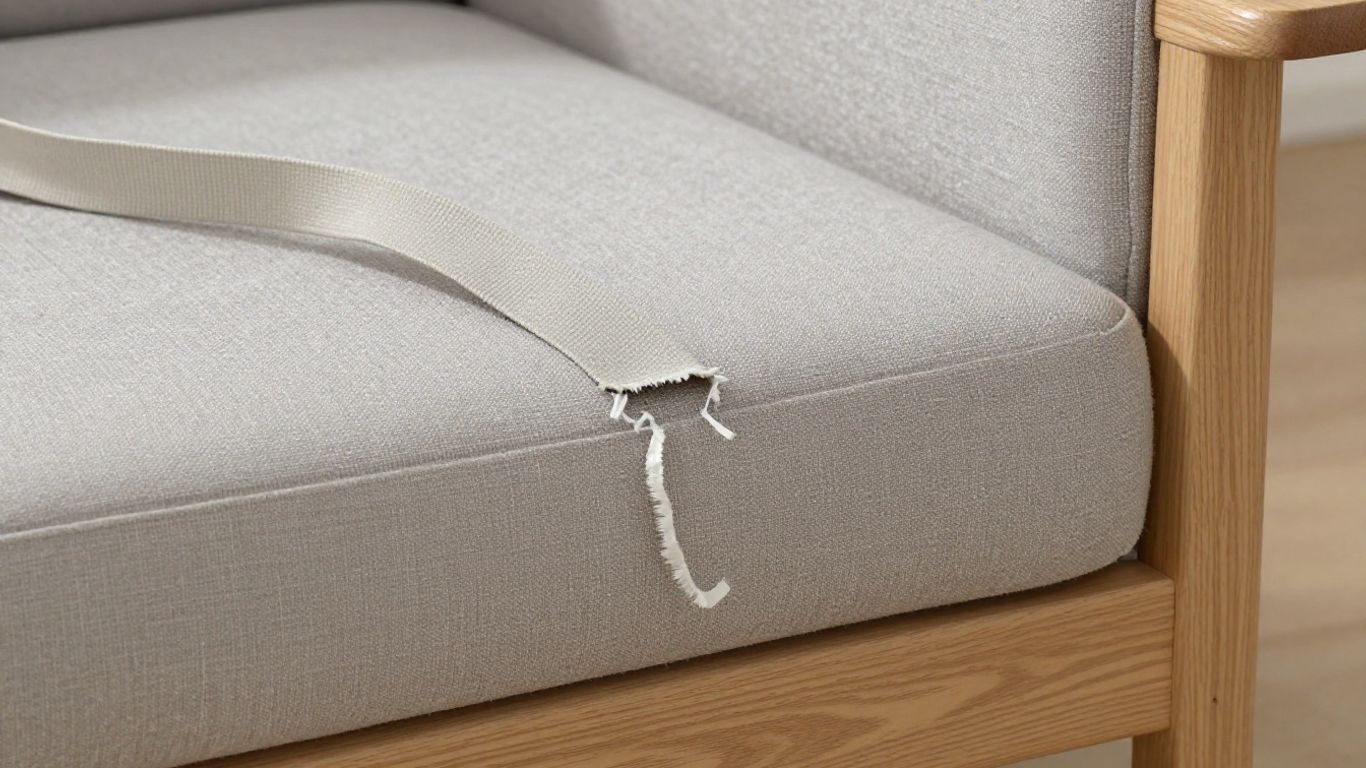
Once you know why it snapped, you need to see how bad the damage really is. Is it just one strip, or are multiple strips affected? Sometimes, one snap puts a lot of extra pressure on the neighboring strips, causing them to fail soon after.
Take your time here. Gently pull on the surrounding webbing to see if it feels loose or weak. It’s better to find out now if you need to replace more than you initially thought.
- Single snap: One broken strip.
- Multiple snaps: Several broken strips, possibly in a row.
- Widespread weakness: Many strips look worn, even if they haven’t snapped yet.
If you find that a lot of the webbing is damaged, or if the furniture is quite old, it might be worth considering a full webbing replacement. This is especially true for pieces that get a lot of use, like a favorite armchair or sofa. For outdoor furniture, you might be looking at replacing vinyl straps or other specific components depending on the material.
Gathering Necessary Repair Supplies
Before you can start fixing that snapped webbing, you’ll need to get your hands on the right stuff. It’s not just about grabbing any old strap; the type of webbing and the tools you use really make a difference in how well the repair holds up.
Choosing the Right Type of Webbing
There are a few common types of webbing you’ll encounter. Jute webbing is a classic choice, often used in traditional upholstery. It’s strong and provides a good foundation, but it doesn’t have much give. You might also find elastic webbing, sometimes called Pirelli webbing, which has a bit of stretch to it. This can make for a more comfortable seat, but it tends to wear out faster than jute. Commercially made furniture sometimes uses synthetic webbing, which is durable but can be less forgiving to work with. For most DIY repairs on older furniture, jute is a reliable bet.
Essential Tools for Webbing Repair
Having the right tools makes the job so much easier. You’ll definitely want a good pair of scissors or shears for cutting the webbing cleanly. A staple gun is pretty much a must-have for securing the webbing to the frame. If you’re going the traditional route, a magnetic tack hammer and upholstery tacks are what you’ll need instead of staples. A webbing stretcher is also super helpful for getting the right tension on the straps before you fasten them down. You might also need a pry bar or flathead screwdriver to remove old staples or tack strips.
Here’s a quick rundown of what you might need:
- Webbing (jute or elastic, depending on your furniture)
- Heavy-duty scissors or shears
- Staple gun and staples (or magnetic tack hammer and upholstery tacks)
- Webbing stretcher
- Measuring tape
- Pliers (for pulling out old staples)
Selecting Appropriate Fasteners
When it comes to attaching the webbing, you have a couple of main options: staples or upholstery tacks. Staples are quick and easy, especially if you have a good staple gun. Just make sure you’re using staples that are long enough to get a good grip on the wood frame. If you’re going for a more authentic look or if your furniture has a delicate frame, upholstery tacks might be a better choice. They’re hammered in with a tack hammer and provide a very secure hold. Regardless of which you choose, make sure they’re strong enough to withstand the tension of the webbing. You don’t want your hard work coming undone!
When securing webbing, pay attention to how you place your fasteners. If you’re using staples, try to stagger them rather than lining them up in a straight row. This helps prevent the wood from splitting along the line of staples.
If you’re unsure about the best supplies for your specific piece, a local upholstery supply shop can be a great resource. They can help you find the right webbing and fasteners for your project.
Preparing the Furniture Frame
Before you even think about attaching new webbing, you’ve got to get the frame itself ready. This is a super important step, kind of like prepping a canvas before you paint. If the frame isn’t solid, your new webbing won’t last long, no matter how well you install it.
Cleaning and Inspecting the Frame
First things first, flip that piece of furniture over and give the frame a good once-over. You want to see what you’re working with. Look for any loose bits, cracks, or signs of rot. If you find any, now’s the time to deal with them. Give the whole frame a good wipe down with a slightly damp cloth to get rid of any dust or grime. This helps you see any imperfections more clearly and also makes sure the new webbing has a clean surface to grip onto.
- Check for structural integrity: Make sure the wood isn’t soft or crumbly.
- Remove old staples or tacks: Carefully pry out any old fasteners that might get in the way.
- Clean thoroughly: Dust and debris can prevent good adhesion for glue or new fasteners.
Filling and Sanding Imperfections
Got any holes or gouges? You’ll want to fill those. A simple wood filler or even a mixture of sawdust and wood glue can work wonders. Just pack it into the damaged areas. Once it’s dry, you’ll need to sand it smooth. The goal is a perfectly flat surface where the webbing will eventually sit. Don’t go crazy sanding the whole frame unless it’s really rough; focus on the areas where the webbing will be attached. After sanding, give it another quick wipe to remove all the dust. A smooth, clean frame is key for a lasting repair. If you’re dealing with a really old piece, you might want to check out upholstery techniques for more in-depth prep advice.
Sometimes, you might find old staple holes that look a bit iffy. If the wood around them is soft, it’s worth reinforcing that area. You don’t want your new staples to just pull out later on.
Executing the Furniture Webbing Repair
Alright, so you’ve got your frame prepped and your new webbing ready to go. This is where things start to look like actual furniture again. It might seem a little daunting, but take it step-by-step, and you’ll be golden.
Attaching the First Webbing Strip
First things first, you need to get that initial strip of webbing attached. Decide where you’re starting – usually, it’s best to start with a vertical strip right in the center of the frame. Unroll a good length of webbing, leaving a few extra inches at the end. Secure this end to the frame using your staple gun. Aim for about 4 or 5 staples, placed close together. Don’t cut the webbing yet; leave that extra bit hanging off for now. This excess will be folded over and stapled again later for extra strength.
Tensioning and Securing the Webbing
Now for the part that actually gives your furniture its support: tension. This is where a webbing stretcher comes in handy. You can’t just pull it tight with your hands; you need that tool to get it really taut. Hook the stretcher onto the webbing a few inches from the edge, position it on the frame, and push down hard. You want it so tight that it barely gives when you press on it. Once it’s at the right tension, secure it with staples – again, about 4 or 5 in a tight cluster. Then, fold over that excess webbing you left earlier and staple it down securely. This double-stapling method is key for durability. You can find good quality twill tape webbing that will hold up well.
Weaving Subsequent Webbing Layers
With the first strip in place, you’ll start weaving the rest. If you started with a vertical strip, your next strips will be horizontal, and vice-versa. The trick here is to alternate weaving over and under each existing strip. So, if your first horizontal strip went over the first vertical strip, the next horizontal strip should go under it. Keep this pattern consistent. As you weave, try to maintain even spacing between the strips. Don’t cut the webbing until you reach the end of the run; just weave it across the frame. When you get to the end, repeat the tensioning and securing process: stretch it tight, staple, fold over the excess, and staple again. Remember, don’t cut any webbing until you’re ready to attach an end.
Finalizing Webbing Attachment
Continue this process of weaving, tensioning, and securing until the entire area is covered. You want to fit as much webbing as you can without it overlapping, as this provides the best support. If you’re working on a seat, you’ll want to pack it in pretty tightly. For chair backs, you might not need quite as much tension or density, as they don’t bear as much weight. It’s a bit of an art, but you’ll get a feel for it. Just keep that tension consistent across all the strips. If you’re unsure about the best materials, places like Foam & Upholstery Centre can offer advice.
When you’re attaching the webbing, especially on older furniture, be mindful of the frame’s condition. Don’t pull so hard on one side that you risk damaging or collapsing a weaker section. Balance your tensioning as you go around the frame.
Reinforcing and Finishing Touches
Alright, so you’ve wrestled that webbing into submission and it’s looking pretty good. But we’re not quite done yet. To make sure this repair lasts and looks as professional as possible, we need to add a few extra bits.
Adding Upholstery Tacks for Durability
Think of upholstery tacks as the tiny but mighty bodyguards for your new webbing. They add a serious layer of security, especially at the ends where the most stress happens. You’ll want to grab some upholstery tacks – the size depends on your furniture. For smaller pieces, 10-ounce tacks are usually fine. If you’re working on something bigger, like a sofa or a sturdy armchair, you might want to step up to 12-ounce tacks. You’ll need a magnetic tack hammer for this. It makes life so much easier. Just place the tack where you want it, give it a gentle tap with the magnetic end to set it, and then use the hammer part to drive it in fully. Hammer three tacks right on top of each end of the webbing. This really helps to lock everything down tight.
Considering Additional Support Layers
Sometimes, especially on older or heavily used furniture, the frame itself might have seen better days. Even with new webbing, a weak frame can cause problems down the line. If you notice any wobbles or feel like the frame isn’t as solid as it could be, it might be worth adding a bit more support. This could mean adding extra bracing or even considering a different type of support system if the original was very basic. For instance, if you used jute webbing and want a bit more give, you could look into adding K-arc springs if your frame can handle them. It’s all about making the repair robust.
Remember, the goal here is not just to fix the immediate problem but to make the repair last. Taking these extra steps now can save you a lot of headaches later on. It’s like putting a good coat of paint on a freshly repaired wall – it protects and makes it look finished.
Here’s a quick rundown of what to consider:
- Frame Integrity: Give the frame a good shake. Does it feel solid? Any creaking or wobbling? Address any frame issues before finalizing the webbing.
- Webbing Type: Did you choose the right webbing for the job? Jute is strong but stiff, while elastic webbing offers more give but might not last as long. Make sure it matches the original feel or your desired comfort level.
- Tension: Double-check that all your webbing strips have consistent tension. Too loose and it won’t support weight well; too tight and you risk damaging the frame or the webbing itself.
- Fasteners: Are your staples and tacks holding firm? If you had trouble with staples pulling out, consider using more, staggering them, or even using a stronger staple gun. For a really professional finish, you might even look into custom upholstery services if you’re tackling a complex piece.
Adding these finishing touches makes a big difference in the longevity and overall feel of your repaired furniture. It’s the difference between a quick fix and a lasting repair.
Troubleshooting Common Webbing Issues
Sometimes, even when you’ve followed all the steps, things don’t turn out quite right. Don’t get discouraged! Most webbing problems are fixable with a little patience and the right approach. Let’s look at a few common hiccups and how to sort them out.
Dealing with Insufficient Tension
If your webbing feels too loose after you’ve finished, it’s usually because it wasn’t pulled tight enough during the installation. This can happen if you don’t have a good webbing stretcher or if you rushed the process. The key to good tension is using a proper webbing stretcher and taking your time.
Here’s a quick rundown on how to check and fix tension:
- Check the Feel: Press down on the webbing. It should feel firm and springy, not saggy or soft. You shouldn’t be able to easily push it down more than about half an inch.
- Re-tensioning: If it’s too loose, you’ll likely need to remove the fasteners (staples or tacks) from one end of the affected strip(s) and re-stretch them. Use your webbing stretcher again, pulling it tighter this time before re-securing.
- Weaving Matters: Sometimes, insufficient tension isn’t just about one strip. If the weaving pattern is too loose overall, it can create a general lack of support. You might need to adjust multiple strips.
Remember, webbing that’s too tight can also cause problems, like cracking the frame or making the webbing itself break. It’s a balance, and finding that sweet spot takes practice. Aim for firm, but not strained.
Addressing Staple Failure
Staples are common, especially on newer furniture, but they can sometimes fail. This might mean staples pulling out, not going in deep enough, or not holding the webbing securely. If you’re using an electric stapler, sometimes the power just isn’t enough for tougher webbing or frames. For these situations, you might need to consider a stronger tool or a different fastening method. You can find good polypropylene webbing that’s designed to work well with various fasteners.
- Deep Enough? Ensure your staples are penetrating the frame adequately. If they’re only going in a little, they won’t hold.
- Too Few Staples? Sometimes, just adding more staples along the edge can make a big difference. A common technique is to use a triangle pattern, then fold the webbing over and add another triangle.
- Wrong Staple Size: Using staples that are too short or too thin is a common mistake. Check the recommended staple size for your webbing and frame material.
Correcting Weaving Pattern Mistakes
It’s easy to get a bit mixed up with the over-under pattern, especially when you’re working on a large piece or have many strips to weave. Don’t panic if your pattern isn’t perfect! Often, minor weaving errors don’t significantly impact the support. However, if it looks really messy or you suspect it’s affecting the tension, here’s what to do:
- Assess the Impact: Look closely at the area. Is the webbing bunched up? Are there large gaps? Does it feel uneven?
- Gentle Adjustment: If possible, try to gently unpick a few rows and re-weave them correctly. It’s best to do this before you’ve added too many fasteners, as removing and re-tacking can weaken the frame over time.
- Embrace Imperfection: Honestly, sometimes you just have to accept a slightly wonky pattern. If the webbing is still providing good support and the furniture is usable, a slightly imperfect weave is usually fine. Many traditional upholstery techniques involve inspecting and tensioning jute webbing where minor pattern variations are common.
If you’re consistently having trouble, it might be worth watching a few more videos or even taking a short workshop to get a better feel for the process.
Conclusion
Fixing snapped furniture webbing might seem a bit daunting at first, but it’s totally doable. By following these steps, you can bring new life to your favorite chairs and sofas. It’s a great way to save money and keep furniture out of the landfill. So, don’t toss that wobbly seat just yet – give this repair a try!
Frequently Asked Questions
What kind of webbing should I use?
You can use jute webbing or cotton webbing for most furniture. Jute is strong but doesn’t have much give, while cotton webbing is also a good choice. Some modern furniture uses elastic webbing, but it doesn’t last as long as the traditional types.
How tight should the webbing be?
The webbing needs to be quite tight. Think about it like a trampoline – it needs to be firm to support weight well. You’ll use a webbing stretcher tool to get it nice and taut before you secure it.
Can I use a regular staple gun?
Sometimes, yes, but it can be tricky. Electric or pneumatic staple guns are often better because they have more power. Cheaper, manual staple guns might not sink the staples deep enough, and the webbing could pull loose. If your frame is thin, be careful not to split the wood with the staples.
What are upholstery tacks for?
Upholstery tacks are small, sturdy nails used to add extra strength at the ends of the webbing, on top of the staples. They help make sure the webbing stays put, especially where it’s under the most stress. Use them to hammer down the folded-over ends of the webbing.
Do I need a special tool to stretch the webbing?
Yes, a webbing stretcher is really helpful, and often necessary. It’s a tool with teeth that grips the webbing, and a handle you push down to pull the webbing really tight across the frame. Trying to do it by hand just won’t get it tight enough.
What if I mess up the weaving pattern?
Don’t sweat it too much! If you mess up the over-and-under pattern a little, it’s usually not the end of the world. The main thing is that the webbing is securely attached and provides good support. Trying to pull out staples can make more holes, so sometimes it’s best to just work with it.