
When rewebbing a chair, the width of the webbing is a key factor for comfort and durability. Here are the main points to remember:
Key Takeaways
- Check your chair’s existing webbing and frame structure to see how it was originally done.
- Measure the distance between the frame grooves accurately, and account for a little stretch.
- For most chairs, 2-inch wide webbing offers a good balance of support and flexibility.
- Thicker webbing, like the “red stripe” jute, is better for seats needing extra sturdiness.
- Even tension and proper spacing of the webbing straps are vital for maximum support.
Understanding Chair Webbing Width
When you’re thinking about fixing up an old chair or building a new one, the width of the webbing might not seem like a big deal at first. But honestly, it plays a pretty important role in how the chair feels and how long it lasts. It’s not just about slapping some straps on there; there’s a bit more to it.
Assessing Existing Webbing and Chair Structure
First things first, take a good look at the chair you’re working with. If it’s an older piece, see what kind of webbing is already there, or what kind of marks are left behind. You’ll want to remove any cushions to get a clear view of the frame. Look for grooves or slots where the webbing was attached. Sometimes, you’ll see one long groove running front to back, or side to side. Other times, there might be smaller slots all around the frame. This tells you how the original webbing was meant to be installed – whether it was woven or just ran in one direction. The way the chair was originally constructed is your best clue for how to re-web it. If you’re unsure, check out how similar chairs are put together. Sometimes, you can find old webbing clips still in place, which can give you a hint about the width and type of webbing used. For example, if you see wide, flat marks, it suggests wider webbing was used.
Determining Webbing Needs Based on Chair Type
Different chairs need different things. A heavy-duty dining chair that gets a lot of use will need sturdier webbing than, say, a decorative accent chair. For chairs that need to support a lot of weight, like dining chairs or armchairs, you’ll want to use wider webbing. This gives you better support and spreads the load more evenly. For lighter-duty chairs, you might get away with narrower webbing. Think about how the chair will be used. Will it be for casual lounging, or for sitting upright for long periods? This will influence not just the width but also the material and how tightly you tension it. For instance, a chair that needs to feel really plush might use a different type of webbing than one that needs to feel firm and supportive. You might even consider using high-density foam in conjunction with webbing for added comfort on certain chair types.
The Role of Webbing Width in Support and Comfort
So, how does width actually affect things? Wider webbing generally offers better support because it distributes weight over a larger area. This means less pressure on any single point, which can make the seat feel more comfortable over time. If you use webbing that’s too narrow for a chair that needs a lot of support, it can sag or even break under pressure. On the other hand, using excessively wide webbing on a delicate frame might not be ideal either. It’s about finding that sweet spot. A good rule of thumb is to match the webbing width to the frame’s capacity and the chair’s intended use. For most standard seating applications, a width of around 2 to 3 inches is pretty common. However, some specialized applications might call for different sizes. Remember, the goal is to create a supportive and comfortable surface that lasts. If you’re looking for a strong, flexible option, consider 25mm black twill tape for various projects.
Measuring for Optimal Webbing Fit
Alright, so you’ve got your webbing, and you’re ready to get it on the chair. But wait, how much do you actually need? And how do you make sure it’s going to be tight enough without ripping the frame apart? Measuring is key here, and it’s not as complicated as it might sound. Let’s break it down.
Accurate Measurement Between Frame Grooves
First things first, you need to figure out where the webbing is going to sit. Look at your chair frame. Most chairs designed for webbing have little grooves or slots where the webbing will attach. You need to measure the distance between these points. If your chair has one long groove on the front and back, measure from one end of that groove to the other. If you have multiple smaller slots, measure from the center of one slot to the center of the next. This distance is your starting point for cutting your webbing.
For chairs with grooves on all four sides, you’ll be weaving the webbing. In this case, you’ll measure the distance between the front and back grooves, and then separately, the distance between the side grooves. You’ll also need to account for the width of the webbing itself when figuring out spacing.
Accounting for Webbing Stretch and Tension
Webbing, especially the rubber kind, is designed to stretch. This is what gives you that supportive, comfortable seat. You don’t want to cut your webbing to the exact measurement of the frame; you need to cut it a little shorter to account for this stretch. How much shorter? It depends on the type of webbing and how much tension you want. For rubber webbing, cutting it about an inch shorter than the measured distance is a good starting point. This allows you to use a webbing stretcher to get it nice and taut.
If you’re using jute webbing, it doesn’t stretch as much, so you’ll need to be more precise with your measurements and rely more on the webbing stretcher to achieve the right tension. Remember, the goal is a firm, supportive seat, not a bouncy one!
Calculating Strap Length for a Snug Fit
So, let’s put it all together. Here’s a simple way to figure out your strap lengths:
- Measure the distance between the attachment points (grooves or slots) on your chair frame. Let’s call this ‘Frame Distance’.
- Decide on your webbing type and how much you want it to stretch. For rubber webbing, aim to cut your strap about 1 inch shorter than the ‘Frame Distance’. For jute, you might cut it only 0.5 inches shorter, or even the exact ‘Frame Distance’ if you plan to use a stretcher extensively.
- Add extra for attachment. You’ll need a little extra length on each end to fold over and secure with tacks or clips. Add about 2-3 inches total for this.
So, your calculated strap length would be: Frame Distance - (Desired Stretch Allowance) + (Attachment Extra).
For example, if your frame distance is 18 inches and you’re using rubber webbing, you might cut your straps to 17 inches (18" – 1" stretch allowance). If you need to weave the webbing, you’ll also need to factor in spacing. A good rule of thumb is to leave about 1 to 1.5 inches between straps when weaving, depending on the chair type and how much support is needed. You can find some great stretchy, strong webbing that’s perfect for this.
Getting the measurements right is super important. If you cut the straps too long, they won’t be tight enough, and your seat will feel saggy. Cut them too short, and you might not be able to attach them properly, or you could even damage the frame trying to force them. Take your time with this step; it really makes a difference in the final result. You might even want to cut one strap first, test the fit, and then cut the rest to that exact length.
Here’s a quick look at how much webbing you might need for different chair types, keeping in mind these are general guidelines:
| Chair Type | Typical Webbing Width | Estimated Straps (Front to Back) | Estimated Straps (Side to Side, if weaving) | Notes |
| :————– | :——————– | :——————————- | :—————————————— | :————————————– | :—————————————- |
| Dining Chair | 1.5" – 2" | 3-5 | 3-5 | Needs good tension for daily use. |
| Armchair | 2" – 3" | 4-6 | 4-6 | Often supports springs, needs more support. |
| Small Stool | 1" – 1.5" | 2-3 | N/A | Less weight, less webbing needed. |
| Bench | 2" – 3" | 5-8+ | 5-8+ | Depends on length and intended use. |
Remember to always check the original construction of your chair if possible. Sometimes, old chairs have specific patterns or spacing that you’ll want to replicate for authenticity and proper support. If you’re unsure, it’s better to err on the side of slightly more webbing than not enough. You can always trim excess, but you can’t add what isn’t there!
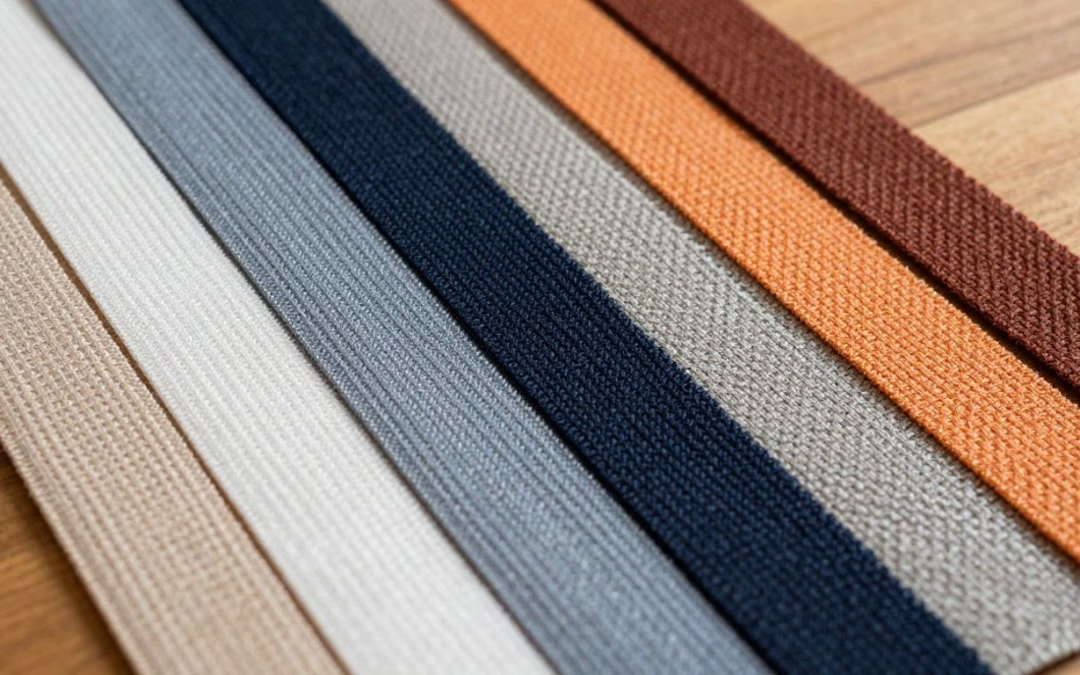
Selecting the Right Webbing Material
Choosing Between Rubber and Jute Webbing
When you’re looking to replace the webbing on a chair seat, the first big decision you’ll face is the type of material. The two main players in this game are jute and rubber webbing. Jute webbing is a more traditional choice, often found in older furniture. It’s known for being strong and sturdy, making it a good pick if you’re going for that classic feel or if the chair frame itself is quite robust. On the other hand, rubber webbing offers a bit more give and elasticity. This type is fantastic for modern chairs where you want that extra bit of comfort and a slightly springier feel. It’s less about rigid support and more about a comfortable, yielding base. Think of it like the difference between a firm mattress and one with a bit of bounce.
Identifying Sturdy Webbing Varieties for Seats
Beyond the basic jute vs. rubber, there are other factors to consider for durability. You want webbing that can handle the weight and daily use without sagging or breaking. For heavy-duty applications, like on a dining chair that gets a lot of use, you might look for something like a 25mm beige C36 webbing. This kind of material is built tough, resisting wear and tear really well, which is exactly what you need for a seat that’s going to be sat on regularly. It’s not just about the material type, but also how it’s constructed. Look for tightly woven webbing that feels substantial in your hands. Avoid anything that feels flimsy or looks like it could fray easily.
Considering Webbing Thickness for Durability
Thickness plays a pretty big role in how long your webbing will last. Thicker webbing generally means more durability. If you’re dealing with a chair that needs to support a lot of weight, or if you just want the peace of mind that comes with a really solid repair, opting for a thicker webbing is a smart move. It’s not always about the width, though; thickness contributes significantly to the overall strength. For most standard chair seats, a good middle-ground thickness will work fine, but for chairs that see a lot of action or are meant for heavier individuals, don’t shy away from the thicker options. It’s a simple way to make sure your repair lasts.
The foundation of a good chair repair often comes down to the materials you choose. Getting the right webbing means your seat will be comfortable and supportive for years to come. It’s worth taking a little extra time to pick something that’s built to last, rather than just grabbing the first thing you see.
Here’s a quick rundown of what to look for:
- Jute Webbing: Great for traditional furniture, strong and firm.
- Rubber Webbing: Offers more stretch and comfort, ideal for modern designs.
- Heavy-Duty Varieties: Look for tightly woven, robust materials for high-traffic chairs.
- Thickness: Thicker webbing generally means greater durability and support.
Webbing Installation and Spacing
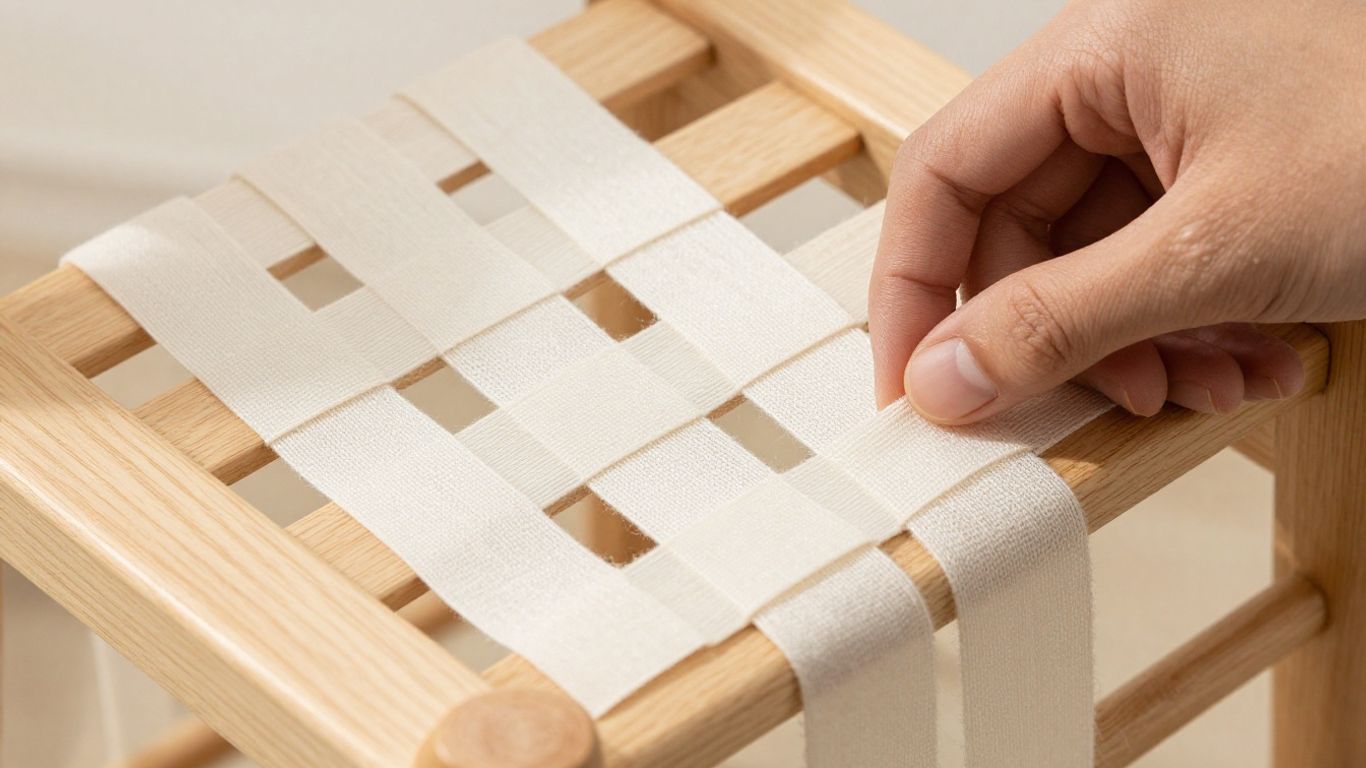
Alright, so you’ve got your webbing, you’ve measured it up, and now it’s time to actually get it onto the chair. This is where things can get a little tricky, but stick with it, and you’ll have a comfy seat in no time. The goal here is to get the webbing attached securely and spaced out just right so it holds up well.
Properly Attaching Webbing Clips
First off, let’s talk about those clips. If you’re using rubber webbing, you’ll likely need special clips to hold it in place. These usually attach to the ends of the webbing straps. You’ll want to look at your chair’s frame and see how the old webbing was attached, or check the grooves where the new webbing will sit. Some grooves are straight, and some are angled. The type of clip you need often depends on the angle of these grooves. For example, if your groove is only slightly angled, you might need 45-degree clips. Make sure you get the right ones for your specific chair. Getting the clips right is key to a secure attachment. You’ll typically need two clips per strap end, one on each side of the webbing. Just slide the webbing into the clip and then insert the clip into the groove on the chair frame. It’s often easier if you have an extra pair of hands for this part, especially when you’re trying to keep tension on the strap.
Achieving Even Tension Across Straps
This is probably the most important part of the whole process. If your webbing isn’t tight enough, the seat will sag, and it won’t be comfortable. If it’s too tight in one spot and loose in another, it can put uneven stress on the frame and might even cause damage over time. When you’re attaching the webbing, you need to pull it taut. For jute webbing, this is where a webbing stretcher tool really comes in handy. You hook it onto the webbing, brace it against the frame, and push down to really stretch it out before you tack it in place. For rubber webbing, you’ll just have to pull as hard as you can by hand, or with a helper, before securing it with the clips. Try to pull each strap with about the same amount of force. It’s not an exact science, but you’ll get a feel for it.
Spacing Webbing for Maximum Support
How far apart you space your webbing straps makes a big difference in how well they support weight. Generally, you want to fit as much webbing as you can into the frame without it overlapping, especially on seats. For dining chairs or chairs that will get a lot of use, you’ll want the straps closer together. A good rule of thumb is to start with a central strap and then space the others out evenly on either side. If you’re using 2-inch wide webbing, leaving about an inch between each strap is a common practice. However, if you’re weaving the straps (going both front-to-back and side-to-side), you’ll need a bit more space, maybe around 1.5 inches, to allow for the weaving pattern. Always check the original setup if possible; it’s usually designed for a reason. For example, jute webbing is often spaced closely to provide a firm base.
Remember that old frames can be a bit fragile. If you put too much tension on one side without balancing it out with webbing on the other side, you could end up with a wobbly frame or worse, a collapse. Work from the center outwards and try to keep things balanced as you go.
Webbing Width Considerations for Different Chairs

So, you’ve got your webbing, you’ve measured, and you’re ready to get this chair seat project rolling. But wait, does the type of chair actually change how wide your webbing should be? Yep, it totally can. Different chairs have different jobs, and that means they need different kinds of support. Let’s break it down.
Webbing Width for Dining Chairs
Dining chairs are usually built to take a bit of a beating. You’re sitting down, getting up, maybe shifting around while you eat. They need to be sturdy. For these, you’ll often see webbing that’s a bit wider, maybe around 2 to 3 inches. This gives a solid base and spreads the weight out nicely. You don’t want a narrow strap digging in when someone’s leaning back.
Webbing Width for Armchairs
Armchairs are more about lounging and comfort. Think plush cushions and sinking in. While the seat itself might still need good support, the webbing might not need to be as beefy as a dining chair. Sometimes, you’ll see narrower webbing, maybe 1.5 to 2 inches, especially if it’s part of a more complex spring system underneath. The focus here is often on creating a smooth, supportive surface for the cushions, rather than just brute strength. For really plush seating, you might even find that the webbing is just a base for other materials, like high-density foam.
Webbing Width for Benches and Stools
Benches and stools can be a mixed bag. A simple wooden stool might just need a couple of wide straps for basic support. A padded bench, though, might have a setup more like an armchair. Generally, for benches and stools that are meant to hold weight, you’re looking at webbing in the 2 to 3-inch range. It’s all about making sure the surface feels stable and doesn’t sag. If you’re working on a bench that’s going to see a lot of use, like at an entryway, you’ll want to make sure you’re using a strong, durable type of webbing, perhaps the "red stripe" jute variety, which is known for its sturdiness.
Remember, the goal is always to match the webbing’s width and strength to the chair’s intended use. A chair that’s meant for heavy daily use will need wider, stronger webbing than a decorative accent chair. It’s about getting that right balance between support and comfort for whatever piece of furniture you’re working on.
Conclusion
Rewebbing your chair can seem like a big job, but it’s totally doable. By figuring out how wide your webbing needs to be and taking your time with the measurements and installation, you can bring back that comfy, supportive feel to your favorite seat. It’s a rewarding project that saves a chair from the landfill and makes it feel brand new again. So, go ahead, give your chair the upgrade it deserves!
Frequently Asked Questions
How do I know what width of webbing my chair needs?
Look at the old webbing if it’s still there. Most chairs use about 2-inch wide webbing, especially the stretchy kind. If you’re starting from scratch, 2 inches is usually a safe bet for most seats. It gives good support without being too stiff.
Can I use wider or narrower webbing than what was originally there?
You can, but it’s best to stick close to the original width. If you use webbing that’s too narrow, you might need a lot more straps, and they could dig in. If it’s too wide, it might not fit into the grooves on the chair frame properly, or it could be too stiff.
Does webbing width matter for different types of chairs?
Yes, it can. For a dining chair where you sit for shorter periods, standard width is fine. For a comfy armchair where you might relax for hours, you want webbing that offers good give and support, so the right width and material are important. Benches might need wider or multiple straps depending on their size.
What’s the difference between rubber and jute webbing width?
Rubber webbing is usually stretchy and comes in standard widths like 2 inches. Jute webbing is more like a strong fabric strip, and while it comes in different widths, the sturdier types for seats are often around 2 inches too. The key is how much they stretch and support.
How many straps of webbing should I use?
This depends on the size of your chair seat and the width of the webbing. You want to space them evenly so there’s no big gap anywhere. For 2-inch webbing, you might fit about 5 to 7 straps across a standard chair seat, leaving a little space between each one for comfort and to avoid them rubbing too much.
Will the webbing width affect how the cushion sits?
Absolutely. The webbing creates the base for your cushion. If the webbing is too narrow or spaced too far apart, the cushion might sag in the middle. Properly spaced and tensioned webbing of the right width will give you a firm, even surface for the cushion to rest on, making it much more comfortable.