
Here are the main points to remember when using webbing and ratchet straps for truck cargo in South Africa. Keep these in mind for safe and secure hauling.
Key Takeaways
- Always check the Working Load Limit (WLL) on your straps to make sure they can handle the weight of your cargo.
- Pick the right strap width and length for your load. Longer and wider straps are usually better for heavier items.
- Use reliable anchor points on your truck or trailer. Never attach straps to weak or fragile parts of your cargo.
- Tighten straps firmly but avoid overtightening, which can damage your cargo or the straps themselves.
- Regularly inspect your straps for any signs of wear or damage, and replace them if they look worn out.
Choosing The Right Webbing and Ratchet Straps for Truck Cargo in South Africa
Alright, so you’ve got a truck and you need to haul stuff. Whether it’s for work or just moving some big items, securing your cargo properly is a big deal. It’s not just about keeping your load from shifting around; it’s about safety for you, other drivers, and your stuff. Picking the right webbing and ratchet straps might seem straightforward, but there are a few things to consider, especially here in South Africa.
Understanding Working Load Limits (WLL)
This is probably the most important thing to get right. You’ll see "WLL" printed on the strap’s tag, and it tells you the maximum weight the strap can safely handle during normal use. Think of it as the strap’s safe working weight. It’s usually a third of the strap’s breaking strength. So, if you’re hauling something that weighs 500kg, you can’t just grab any old strap. You need straps that, when combined, have a WLL of at least 500kg. Never, ever exceed the WLL, or you’re asking for trouble. It’s better to have straps that are rated higher than you need than to risk a strap snapping.
Selecting Appropriate Strap Width and Length
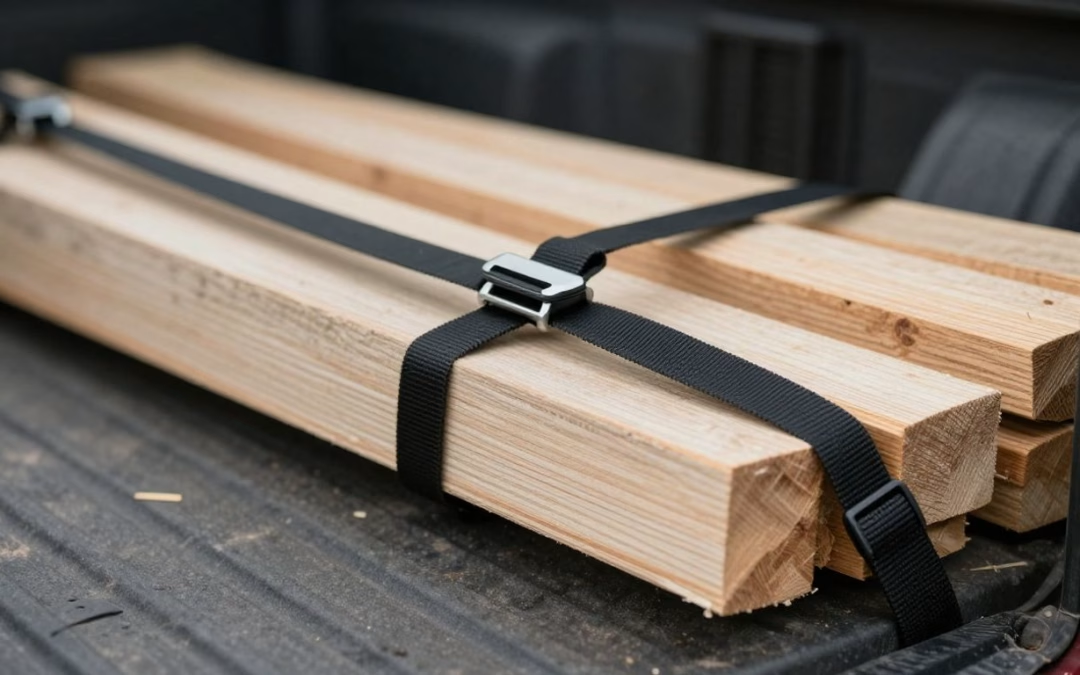
Straps come in different widths, and this matters. Wider straps, typically 1.5 inches to 2 inches, are better for heavier loads because they spread the pressure out more evenly. For most everyday truck bed jobs, a 1-inch wide strap might do the trick, but for serious hauling, go wider. Length is also key. You need enough strap to go around your cargo and reach an anchor point. A common length is 15 feet, which gives you a good amount of flexibility for various items. If you’re hauling bulky things, you might need longer straps. It’s a good idea to have a few different lengths on hand.
Identifying Essential End Fittings
These are the bits at the end of the strap that hook onto your truck or trailer. You’ve got S-hooks, J-hooks, and flat hooks. S-hooks are pretty versatile and work with most standard anchor points. Flat hooks are good for wider anchor points. If you’re hauling something delicate, like a motorcycle or a nice piece of furniture, you might want to look for straps with soft loops. These protect painted or chrome surfaces from getting scratched. Using the right end fitting means your strap connects securely without damaging your cargo or your vehicle. For reliable tools for regularly hauling cargo, ratchet straps are a dependable way to secure items during transport.
Choosing the right gear upfront saves a lot of headaches later. It’s about being prepared and using the correct tool for the job, not just grabbing whatever’s closest.
Mastering The Art Of Securing Truck Cargo
Alright, so you’ve got your straps, you know their limits, and you’re ready to load up. But just slapping straps on isn’t enough. How you position your stuff and where you attach those straps makes a huge difference. Think of it like building a sturdy shelf – you need to place the heavy books at the bottom and make sure the shelf itself is bolted into the wall properly.
Strategic Positioning Of Heavy Items
This is where you start thinking like a Tetris champion. Heavy items, like engines or large toolboxes, should always go on the bottom and as close to the cab of the truck as possible. This keeps your center of gravity low, which is way better for handling, especially when you hit bumps or need to brake suddenly. Lighter stuff? That goes on top. It’s all about stability. If you’re hauling multiple heavy things, try to distribute the weight evenly side-to-side. A lopsided load is just asking for trouble on the road.
Utilizing Space With Fillers
Sometimes, you end up with awkward gaps between items, or maybe you’ve got a big empty space next to a smaller load. Don’t just leave it! Empty space means things can shift. You can use sturdy materials like old blankets, foam padding, or even specially designed cargo bars to fill these voids. The goal is to make everything snug, so nothing can slide or tumble around. This also helps protect your items from banging into each other during transit. For things like furniture, using blankets is a no-brainer to prevent scratches. You can even use some 25mm black polypropylene webbing to cinch down bundles of smaller items before placing them, making them easier to manage and fill gaps with.
Attaching Straps To Reliable Anchor Points
This is probably the most critical step, and where a lot of people mess up. You can have the strongest straps in the world, but if you attach them to a flimsy part of the truck, you’re in for a bad time. Always look for dedicated anchor points. Your truck’s manual is a good place to start, as it’ll show you the spots the manufacturer designed for this. On trailers, you’ll often find D-rings or stake pockets – use those. If you’re thinking about using a random bolt or a piece of trim, stop. Seriously. Ask yourself: ‘Can this hold the weight of my cargo if the truck stops suddenly?’ If you hesitate, find a better spot. The angle of your strap matters too; aim for about 30 to 60 degrees from the horizontal for the best hold.
Securing cargo isn’t just about making it look tight; it’s about preventing movement in all directions. Think about forward, backward, sideways, and up-and-down forces. A well-secured load accounts for all of them, using a combination of positioning, filling gaps, and strategically placed straps attached to strong anchor points.
Step-By-Step Guide To Using Ratchet Straps
Alright, let’s get down to the nitty-gritty of actually using these ratchet straps. It might seem straightforward, but doing it right makes all the difference between a secure load and a potential disaster on the road. Think of it like tying your shoelaces – simple, but you wouldn’t want them coming undone halfway through a run, right?
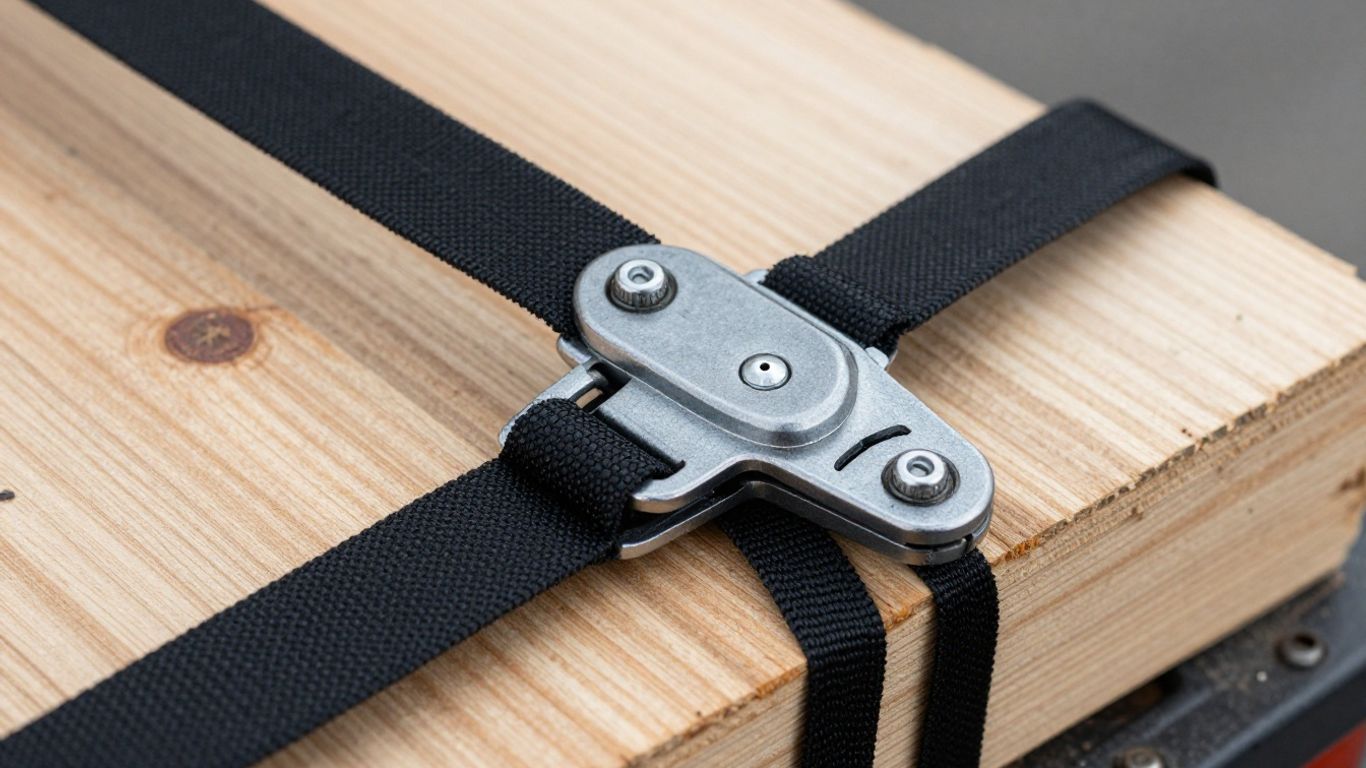
Threading The Strap Through The Ratchet
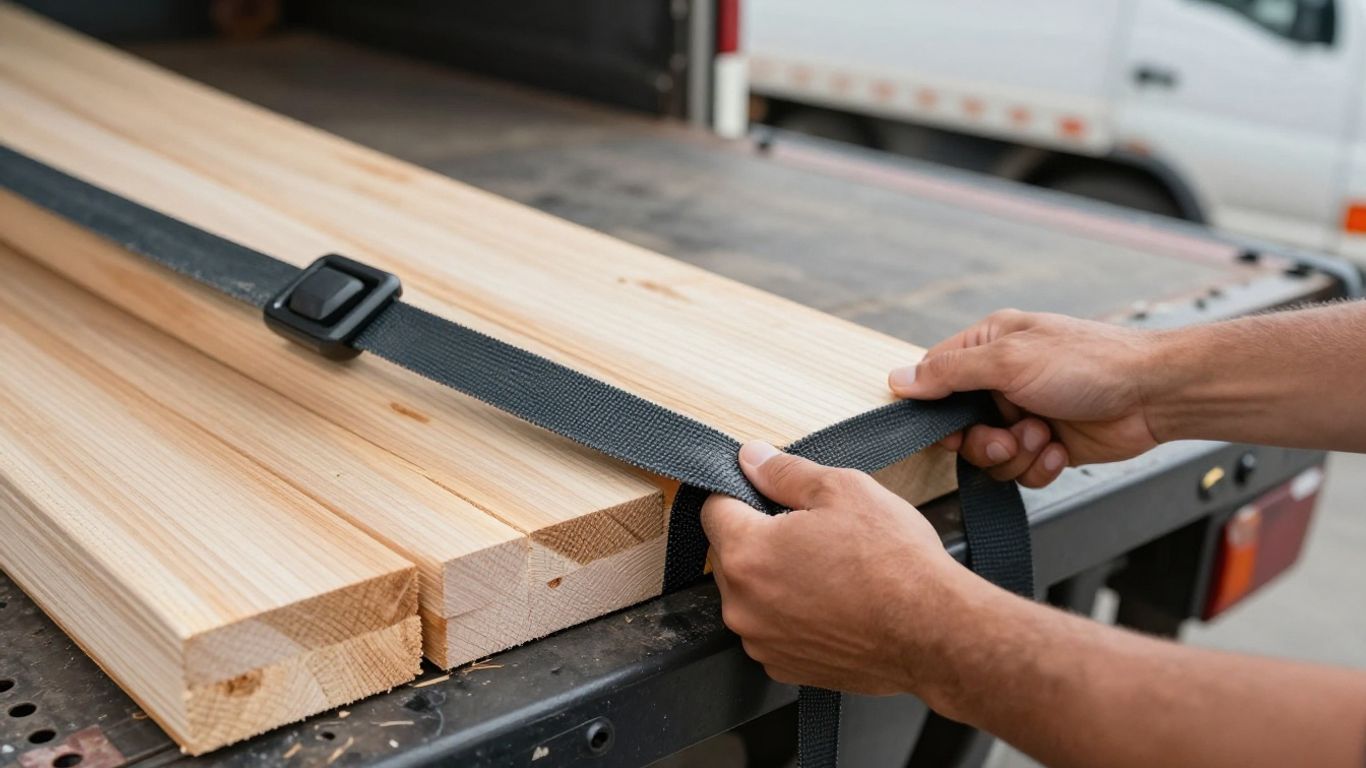
First things first, you need to get the strap threaded. Grab the ratchet mechanism. You’ll see a lever. Push that lever all the way open. If it’s not facing up, give the handle a few pumps until the slot for the strap is pointing skyward. Now, take the loose end of the strap – the part without the hook – and feed it through that slot from the bottom. Pull it through a good few inches, maybe 5 or 6, and then slip it under the main part of the ratchet mechanism. Give the handle a couple of pumps, just enough to get a light grip on the strap. This stops it from just sliding back out while you’re getting ready.
Eliminating Slack And Attaching Hooks
With the strap threaded, it’s time to connect it to your truck. Take the hook on the end of the strap and secure it to a solid anchor point on your truck bed. Do the same with the hook on the other end of the strap. Now, pull on the loose end of the webbing. You want to pull out as much slack as you possibly can by hand. Get it as snug as you can before you even start ratcheting. This makes the next step much easier and more effective. If you’re dealing with a lot of cargo, you might need to use multiple straps, and it’s a good idea to have them attached to reliable anchor points that can handle the load.
Achieving Optimal Tension Without Overtightening
This is where the ‘ratcheting’ part comes in. With all the slack removed and the hooks in place, start pumping the ratchet handle up and down. You’ll feel it getting tighter, and you’ll see the webbing winding around the axle inside the mechanism. Keep going until the strap is good and taut. The goal is a tight, secure fit, but you absolutely do not want to overtighten. Overtightening can damage the strap, the cargo, or even the anchor points. A good rule of thumb? If you can’t easily slip your finger between the ratchet mechanism and the cargo, you’ve probably gone too far. Once it’s tight, bring the ratchet handle all the way down to its closed position. This locks it in place. Fold up any extra webbing and tuck it away so it doesn’t flap around or get caught on anything during your trip. Remember, a properly secured load is key to safe hauling.
Advanced Techniques For Specific Cargo Types
Securing Motorcycles and ATVs Safely
When you’re hauling a motorcycle or an ATV, it’s a bit different than just strapping down a box. You want to protect the bike’s finish and make sure it stays put, even on bumpy roads. Start by using soft loop straps around the handlebars and the rear footpegs. This stops the straps from scratching up any paint or chrome. Then, use straps pulling forward on the front forks to compress the suspension a little. This really helps keep the bike from bouncing around. Always use heavy-duty straps with soft loops for this kind of job.
Protecting Furniture During Transit
Moving furniture can be tricky. First off, wrap any finished surfaces in moving blankets. This is a simple step that saves a lot of headaches later. For items like dressers or bookshelves, it’s best to strap them upright. Don’t lay them flat if you can help it. Use multiple straps to keep them from tipping over. Think about how the weight is distributed and where the straps will get the best grip without damaging the furniture itself.
Transporting Appliances and Building Materials
Appliances, like refrigerators or washing machines, should also be secured upright. Wrap a strap around the middle and another near the top. Before you strap them, tape the doors shut so they don’t swing open during the drive. For building materials like lumber, stack it flat and use at least two straps along its length. If you’re hauling anything with sharp edges, like metal or rough-cut wood, use edge protectors where the straps cross. This stops the straps from getting cut or frayed. You can find specialized straps for things like pallet jacks if you’re moving heavy equipment.
Remember that the angle of your straps matters a lot. Straps pulling straight down are good for stopping bouncing, but straps pulling at an angle, ideally between 30 and 60 degrees from the horizontal, are much better at preventing sliding and tipping. This geometry is key to keeping your load stable.
Maintaining Your Webbing and Ratchet Straps
So, you’ve got your cargo all strapped down tight. That’s great! But what happens after the job is done? Just like any tool, your webbing and ratchet straps need a little TLC to keep them working right and, more importantly, to keep you and your cargo safe. Neglecting them is a recipe for disaster down the road.
Proper Cleaning and Drying Procedures
After a job, especially if you’ve been hauling through mud or rain, give your straps a good once-over. Dirt and moisture are not your straps’ best friends. Grit can gum up the ratchet mechanism, making it stiff or even jammed. And wet webbing? That’s a prime spot for mold and mildew to set in, which can weaken the synthetic fibers over time. The best approach is pretty simple: rinse off any heavy dirt with plain water. Then, just hang them up somewhere they can air dry completely. Never, ever store straps while they’re still damp. It might seem like a small thing, but letting them dry properly is a big deal for their longevity.
Safe Storage Practices To Prevent Degradation
Where you stash your straps when they’re not in use matters a lot. Think of it like putting your tools away after a project. You wouldn’t just toss them in a pile, right? The same goes for your straps. A tangled mess isn’t just annoying to sort out later; it’s a breeding ground for damage. Hooks can get bent, and the webbing itself can get abraded or exposed to nasty chemicals or grease on the floor of your truck. A good habit is to coil the webbing neatly. You can fold it, roll it up like a fire hose, whatever works for you. Then, wrap the ratchet end around the coil and hook it onto itself to keep it tidy. Some folks use rubber bands or zip ties, which is fine too. The main idea is to keep them organized and protected. The ideal storage spot is clean, dry, and out of direct sunlight. UV rays are a major enemy of polyester webbing, making it brittle over time. So, a toolbox, a gear bag, or a shelf in the garage is way better than leaving them out in the open. Keeping them out of the sun helps prevent UV damage.
Recognizing When To Replace Damaged Straps
This is probably the most critical part of strap maintenance. You’ve got to inspect them before every single use. Lay the strap out flat in good light and run your hands along the entire length. Look for any cuts, nicks, or significant fraying. If you see an area that looks fuzzy or feels thin from rubbing against something rough, that’s a sign of abrasion. Check for any discoloration or a chalky feel that might indicate sun damage. Also, give the metal hardware a good look. Are the hooks bent? Does the ratchet mechanism move freely, or is it stiff and gritty? If the ratchet is jammed, don’t force it with a hammer or a pipe – that’s a good way to break it or cause it to release unexpectedly. If you spot any of these issues – cuts, serious abrasion, UV damage, bent hooks, or a faulty ratchet – it’s time to retire that strap. The cost of a new strap is nothing compared to the potential damage or injury from a strap failing mid-trip. When in doubt, throw it out. It’s better to be safe than sorry when you’re hauling loads.
Common Pitfalls To Avoid With Truck Cargo Securement
Alright, let’s talk about the stuff that can go wrong when you’re trying to tie down your load. It’s easy to think you’ve got it all figured out, but a few simple mistakes can turn a smooth trip into a real headache, or worse. We’ve all seen those videos of stuff flying off trucks, right? Most of the time, it’s because someone skipped a step or didn’t pay attention to the details.
The Dangers Of Over-Tightening Straps
So, you’ve got your ratchet strap, and you’re cranking away. You want it super tight, right? Well, going overboard with tension is a common mistake that can actually cause more problems than it solves. When you crank a strap down until the webbing is practically screaming, you risk damaging the strap itself. It puts way too much stress on the fibers, and over time, this weakens the strap. Plus, you can easily damage your cargo. Think about it: cardboard boxes can get crushed, wood can get dented, and even sturdy equipment might have sensitive parts that can break under extreme pressure. It also makes the strap really hard to release later on.
Why Damaged Straps Are A Critical Failure Point
This one seems obvious, but you’d be surprised how often people use straps that have seen better days. Frayed edges, cuts in the webbing, hooks that look bent out of shape, or a ratchet mechanism that’s acting funny – these are all red flags. A strap that looks damaged is a strap that’s likely lost some of its strength. It’s a weak link waiting to snap when you least expect it, especially when the truck hits a bump or takes a corner. Always give your straps a good once-over before each use. If you see any of these issues, it’s time to retire that strap and grab a new one. You can find good replacement straps at most truck supply stores.
The Importance Of Multi-Directional Restraint
Cargo doesn’t just sit there; it moves. When you brake, it wants to go forward. When you accelerate, it wants to go backward. And during turns, it shifts sideways. Relying on straps that only pull in one direction just isn’t enough. You need to think about all the ways your load could potentially shift and secure it against those movements. This often means using straps from different angles. For example, straps running straight over the top help keep things from bouncing, but angled straps from the top corners down to the anchor points on the floor are much better at preventing sliding and tipping. It’s all about creating a stable box around your cargo.
A strap that’s twisted anywhere along its length, especially through the ratchet mechanism, can lose a significant amount of its strength. Always make sure the webbing lies flat and smooth.
Conclusion
Securing your cargo properly with webbing and ratchet straps isn’t just about following rules; it’s about safety for everyone on the road. By picking the right straps, using them correctly, and taking care of your gear, you’ll make sure your load stays put. It might seem like a small detail, but getting it right makes a big difference. So, next time you’re loading up, take a few extra minutes to strap it down right. Your cargo, your truck, and other drivers will thank you.
Frequently Asked Questions
What does ‘Working Load Limit’ (WLL) mean?
The WLL is the maximum weight a strap is safe to carry during normal use. Think of it as the strap’s safe limit. You should never put more weight on a strap than its WLL.
How do I know if I’m tightening the strap too much?
If you can’t easily fit your finger between the strap and the cargo where the ratchet is, you’ve probably tightened it too much. The goal is to make the load secure, not to crush it.
Can I use ratchet straps if they get wet?
Yes, most polyester straps are fine when wet. They might stretch a bit more, but they don’t lose much strength. Just make sure they dry out completely before you store them to stop mold.
What’s the difference between a ratchet strap and a cam buckle strap?
Ratchet straps use a handle to tighten them really tight, good for heavy stuff. Cam buckle straps are quicker to use and just get snug, better for lighter things like kayaks or furniture you don’t want to damage.
How often should I check my straps while driving?
It’s a good idea to check your straps after the first 15 minutes of driving, especially if the road is bumpy. Also, give them a quick look every now and then during a long trip. Straps can sometimes loosen up a little.
What should I do if my ratchet strap gets stuck?
First, make sure you’re pushing the release lever all the way. If it’s still stuck, the mechanism might be dirty or too tight. Try gently wiggling the handle back and forth to free it up. Sometimes, a little spray lubricant helps too.